Happy New year to you all!!!
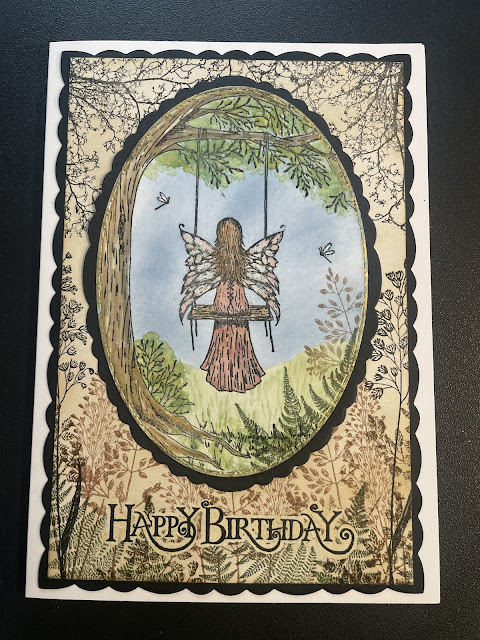
I hope you all had a lovely Christmas and New Year. It was so nice to have a little break but I was itching to get back to my desk. This is my first make of the year - a card that I made for my brothers girlfriend.
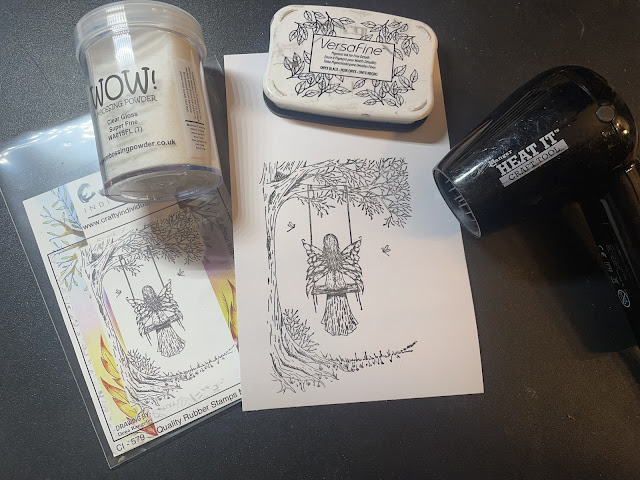
Stamp the fairy in black ink and emboss with clear ultra fine embossing powder.
Die cut image with an oval nesting die.
Apply a thin layer of drawing gum over the fairy and dragonflies with a synthetic brush.
I didn't bother doing the tree as it'll be coloured a darker brown.
Place the crafty Individuals stencil in place and apply some blue distress ink to the sky area.
Now the great thing about this stencil is you also have the matching opposite side. So, place the matching horizon line over the sky area and apply green ink to the lower section to create a grassy area.
Using a piece of kitchen towel dab the area covered in masking gum to remove any unwanted ink to prevent smudging.
Carefully remove the masking gum either with your finger or a glue eraser.
Colour the image - for this I used spectrum noir tri blend pens.
I used a small amount of ink to the edge of the wings then blended the colour into the centre with a blender pen.
Using a black fine liner pen draw in a few extra lines along the left hand side to extend the bark lines.
Dab some different shades of green onto a tile/messy mat and using a watery brush add some colour to the leaves.
With a slightly dryer brush add some texture to the grass area.
Stamp a few ferns and grasses along the bottom right hand side.
Draw a line of quickie glue around the edge, place the foil over the glue line and rub with finger nail. The foil should then stick to the glue.
Apply some stickles glitter glue to the wings on the fairy and dragonflies.
Die cut a decorative border for your topper.
I'm afraid I don't know the make of this die as I don't seem to have the original packaging but you could use any decorative nesting die or just another plain oval.
Take a 5x7 pre folded card blank and die cut a decorative rectangle to fit in black card.
Now cut a piece of white card slightly smaller than your black mount.
Using a blending brush apply some brushed corduroy distress ink to the whole piece of card.

Lay the fairy topper roughly where you plan to stick it - but don't stick it in place just yet!
You can then stamp and emboss the Happy Birthday sentiment.
Using a very fine brush apply a thin layer of drawing gum around the sentiment so it has a little 'halo' around it.
Stamp The trees, ferns and grasses in a selection of black, brown and green ink.
Use a piece of kitchen towel and dab any excess ink off the masking fluid. This is really important this time round as the ink will smudge all over the background when you remove the masking fluid and leave a mess.
Carefully remove the masking fluid.
You should now have a plain halo effect around the sentiment making it pop slightly and prevent it getting lost amongst the grasses.
Mount all your pieces onto your card blank using your desired glue.
On this card I actually tried out a new glue which I now love and will be using on future projects. I used Collall all purpose clear glue. Its great for mounting lots of layers as it gives you a little wiggle time to help line up all your layers properly. However I wouldn't recommend using this on smaller die cut pieces as it is a little stringy.
Thank you so much for joining me. Below is a list of all the items I used along with a few links.
Hope to see you back here again soon
X - Dena - X
Shopping list
Crafty Individuals products:
White card
5x7 card blank
Black card
Oval nesting Die
Decorative oval nesting die
Decorative rectangle nesting die
Paper trimmer
Distress Inks
Blending brush
Paintbrush
Glue
Die cutting machine
Black, brown and green ink
Clear embossing powder
Heat gun
Kitchen roll
Masking gum and synthetic brush
Stickles
Foil
Quickie glue pen


No comments:
Post a Comment