Search This Blog

Thursday 20 July 2023

Ballet card - Visible image stamps

Evening All!!

I'm so behind with editing my blog posts at the moment so trying to play catch up, just hope I can remember how I made them all.

This card was made using the fab Born to perform stamp set from Visible Image.


Cut a piece of white card to fit a pre-folded 6x6 card blank leaving room to mount onto black. 

Stamp the ballet dancer in black ink and emboss with clear embossing powder.

To create the background I actually used some 'homemade sprays'. I spinked a small amount of Brushos into a mini mister spray bottle and filled with water and voila! You could actually use spray stains but I don't have any at the moment so making use of what I have in my stash and they actually work really well.

Spritz yellow ochre over the stamped image, then alizarin crimson around the edges. Dry with a heat gun. 
Spritz some bronze distress mica spray to add some shimmer.
Place the Supernova stencil over the stamped image and apply some picked raspberry distress ink with a blending brush.

Stamp and emboss the wording and randomly stamp the stars around the edge.

Mount the topper onto some black card then onto your main pre-folded card blank. 

Add some white highlights with a sakura pen.

Finally add some glossy accents to a couple of the smaller stars to add some interest. Make sure you keep the card on a flat surface while it dries.

 Thank you for joining me.

X - Dena - X


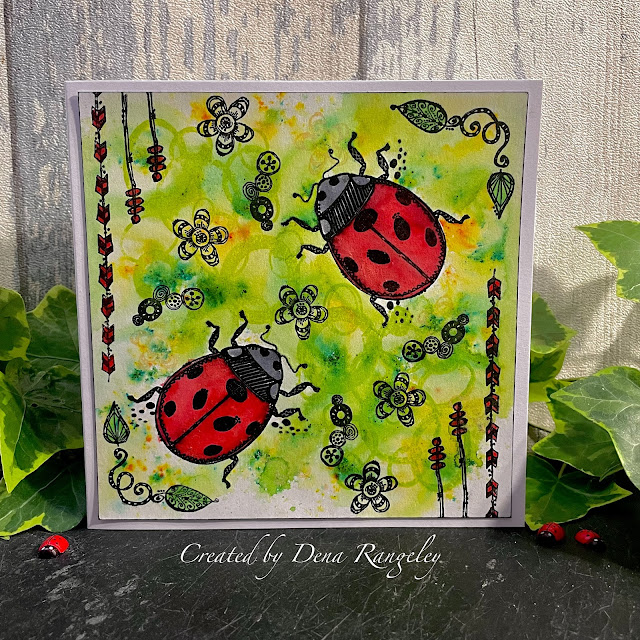
Bee Crafty Ladybird card

Hi Everyone!!

Made this really quick card last night using Doodled Ladybird and Art backrounds 1 from Bee Crafty.


Cut a piece of card to fit a pre-folded 6x6 card blank.

Stamp the ladybird twice in black ink and emboss with clear embossing powder. 

Using a synthetic brush apply a thin layer of Pebeo masking fluid to the ladybirds.

Spritz the card with a fine mister spray bottle of water then sprinkle a small amount of lime green and yellow Brushos over the card. Don't forget less is more!!! Spritz with more water if needed and apply more Brushos until your happy with the overall look. If you do find you have too much just dab with some kitchen roll to remove a little ink. The background will need to be completely dry to continue stamping but you can speed this process up by drying with a heat gun.

Stamp the random circles from the art backgrounds stamp set in Twisted Citroen oxide ink.

Stamp the borders and some of the other elements in versafine black ink.

Remove the masking fluid with a glue eraser. 

Colour the ladybird and border using your preferred medium, for this I used my new Ecoline water colour pens.

I then ran a black ink pad around the edges of the card. I would normally mount the card onto black but I have to admit I was being very lazy and couldn't be bothered to pull all my black card out as I did make this really late at night. 

Finally mount the card topper onto a pre-folded card blank.

Thank you so much for joining me!

X - Dena - X


Saturday 8 July 2023

Studio light butterfly card

Hi Everyone!!

Right I think this will be my last post for tonight and I hope to finish editing my last few posts tomorrow.
This is another really lovely stamp that again doesn't need much work.


Cut a piece of card down to fit on a 6x6 card blank.
Stamp the gorgeous butterfly stamp from Studio Light in black ink and emboss with clear embossing powder.
Sprinkle some pretty gets gritty explosion powder (I think I used Dragon - it was a while ago that I made this card) into a paint palette, sprits with water and apply to the background with a paint brush.

Colour the butterfly and flowers, for this I used Castle arts gold pencil set. I've never really enjoyed using colouring pencils but I have to say I absolutely love this set. 
Use a dark green pencil to add some shading around the butterflies and flowers - this really makes the image pop. 

Mount your stamped image onto a 6x6 card blank.

Thanks for joining me.
X_Dena_X


Crafty Individuals bird card

Hi Everyone!!!

Sharing this card I made for my Grandad's birthday.
I've just noticed this photo is a little blurry - not sure how that happened.


Stamp the lovely Bird stamp in black ink and emboss with clear embossing powder.

Using a blending brush, carefully add some clouds to the background with faded jeans distress inks. To do this lightly ink to lower section, then place the clouds stencil to cover the lower section of the image and flick the ink away from the stencil (being careful not to apply ink to the bird). Move the stencil up to create the second layer of clouds. Keep going until the whole sky is covered, keep swapping and changing the cloud stencils to create different shape clouds.

Colour the rest of the image, for this I used Ecoline water colour brush pens.
Cut to size and mount on a piece of black card. 

Take another piece of card and stamp inky script in brown ink. Use a blending brush to apply a mix of tea dye and faded jeans distress inks. Tear the edges.

Cut the woodgrain paper into a square and mount onto a piece of black card. Then mount onto a 7x7 card blank.
Stick the script into place.
Using  silicone glue stick some sisal fibers in place, then stick the bird image over the fibers. 

Stamp and emboss the sentiments, cut them down to size and mount onto black card.
I'm not sure what make the Grandad sentiment is, I've had it several years and don't seem to have its original packaging. 

Thank you for joining me.

X-Dena-X


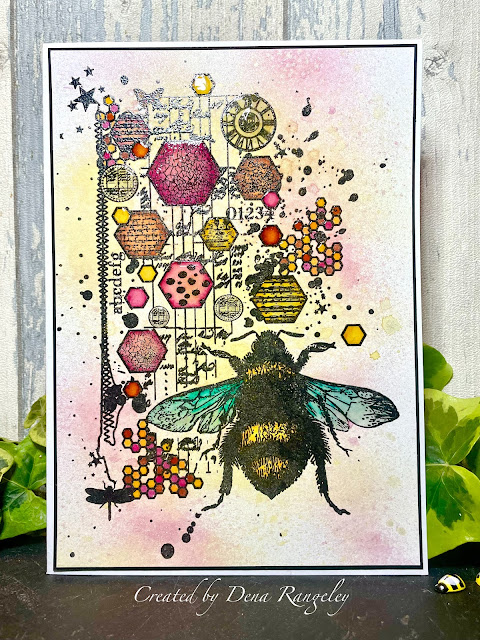
Bee Crafty - Bee card

Hello!!!

Finally managed to sit down and edit a few blog posts this evening so I'm starting with my most recent makes using one of my new stamps from Bee Crafty stamps. This stamp is perfect for creating a really quick and simple card.


Stamp the scripted bee stamp in black ink and emboss with clear embossing powder.
Spray the background with pretty gets gritty sprays. I actually made my own using the powders in a fine mist spray bottle with a little water, but you can buy the actual sprays. These leave a lovely shimmer on your project.
Colour in the Bee and the honeycomb, for this I used my new Ecoline water colour brush pens - which I absolutely love and of course I'm going to have to buy some more colours at some point.
Mount onto a piece of black card and then onto a pre-folded A5 card blank.
Finally add some glossy accents to the wings and some of the honeycomb to add some interest.

Thanks for joining me.
X_Dena_X