Hi Everyone.
This will be my first blog post on something other than cards but I wanted to give you a little insight as to how I etch stamped images into copper.
Some of you may already know that nearly all the items I make are made from dirty old copper pipe - with the exception of bangles, book marks and larger items.
I slice the pipe open with metal snips, open it up with pliers and then hammer it flat with a nylon hammer. I know it would be so much easier to just use copper sheet, I just love the idea of making items from recycled materials.
Once the copper has been flattened, cut to shape. For this particular design I only cut it roughly to size but would normally make sure it’s the correct size and straight lines.
I sanded the copper - being careful not to put fingerprints on it as this can effect the etching process.
Now it’s time to stamp your image. For this I’m using the crafty individual’s collection of stamps. It’s important to use high quality stamps for this process. Clear stamps just don’t leave a very good impression so ideally needs to be made from good quality rubber.
I stamped the image using staz on ink.
Close up of the stamped ferns.
Using a sharpie I run the pen along the side edges to prevent the solution eating away at them - again being careful not to touch the main surface.
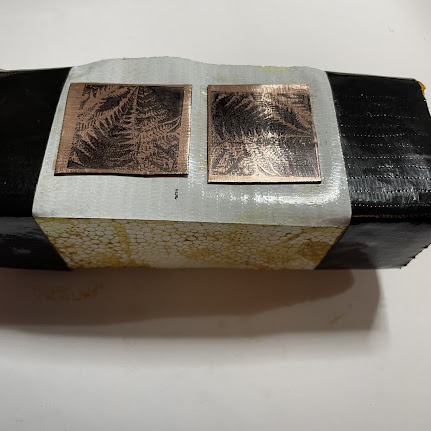
Stick the pieces of copper to some duck tape and attach to a piece of polystyrene.
Pour some ferric chloride solution into a glass dish.
You will need to prepare your surface area and wear protective gloves when handling this.
Before placing the copper in I heat it up with a heat gun to help accelerate the etching process.
Place the copper in the solution. The polystyrene needs to float in the solution so the particles fall to the bottom of the dish.
Everything I’ve read on this process people always say you should only leave it in for a certain amount of time and take it out. There’s been times when I’ve left my pieces in for a several hours before I’ve got the depth I’m happy with. Just keep checking by lifting it up and once your happy with the depth place in a mix of water and baking soda to neutralise and scrub.
I then darkened the background areas and cut the copper closer to the design.


Your artwork in copper is absolutely outstanding and it's really interesting to see how you achieve such amazing results. The CI stamps worl with it really well and I love what you do Dena x
ReplyDeleteThank you xx
DeleteWow, wow, wow! I am in awe of your art work! Totally stunning!
ReplyDelete